
Bathroom sealing forms the foundation of a durable, safe, and hygienic bathroom environment. Tasks like shower tanking protect wet zones from leaks and long-term water damage effectively. Proper shower waterproofing ensures tiles, floors, and walls remain completely dry under daily use. Incorporating waterproofing bathroom cabinets supports furniture longevity while complementing overall moisture protection strategies. Additionally, buying waterproof furniture helps maintain style, reduces maintenance, and extends the lifespan of bathroom fixtures. Read on as we explore 12 essential bathroom sealing tips.
What is bathroom sealing?
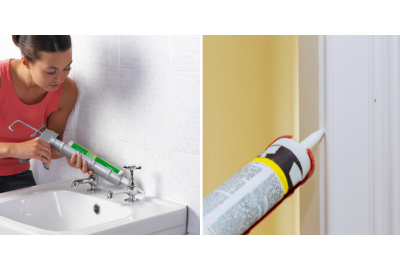
Bathroom sealing involves creating a watertight barrier around baths, showers, sinks, and shower trays to prevent leaks and long-term water damage. The process typically starts by removing old sealant, ensuring the surface is completely dry, clean, and free from residue, mould, or debris. Using the right tools, including a sealant gun and quality silicone sealant, helps achieve strong adhesion along edges, joints, and corners.
Many professionals apply masking tape to guide neat lines, then carefully apply the new sealant evenly into gaps. Smoothing with a finger dipped in soapy water creates a clean finish before allowing the seal to cure fully. Correct bathroom sealing protects tiles, walls, and fixtures, helping maintain durability, hygiene, and overall bathroom quality.

12 tips for waterproofing a bathroom
Effective bathroom sealing prevents moisture penetration, protecting surfaces, fixtures, and structural elements from long-term water damage. Below are twelve of the best tips for waterproofing a bathroom.
1) Apply waterproof and mould-resistant sealant
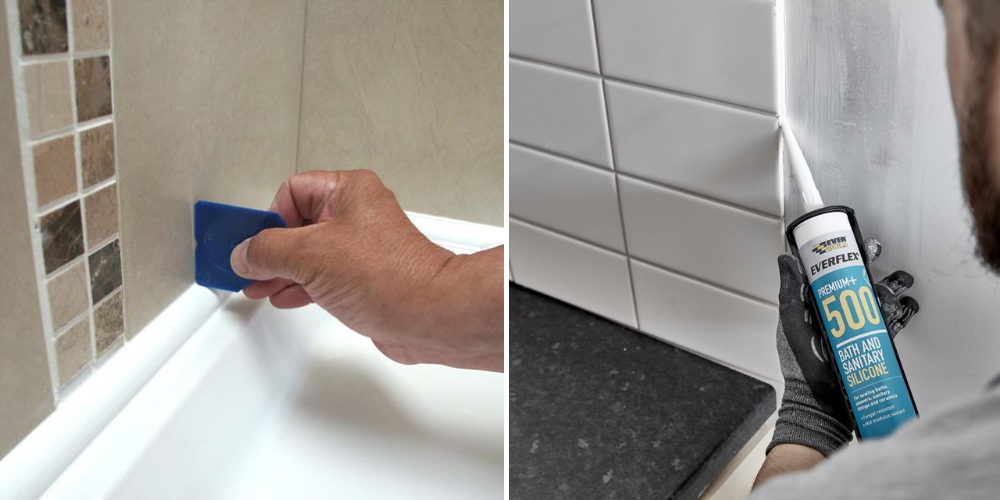
Begin by removing old sealant, ensuring all corners and joints are completely dry beforehand. Use a sealant gun with quality silicone sealant to create a consistent protective line. Apply steady pressure, guiding the nozzle carefully along each joint and corner.
This approach helps fill gaps evenly, improving adhesion and long-term durability. Smooth the bead using a damp finger dipped in soapy water for neat results. Allow the sealant to cure fully before exposing surfaces to moisture. This process creates a reliable watertight barrier around vulnerable areas.

2) Ensure the correct floor falls towards the shower drain
Correct gradients guide water efficiently towards shower trays, reducing standing water risks. Poor falls allow moisture to collect, increasing the chances of leaks and surface deterioration. During installation, regularly check levels across the floor and the surrounding surface. Small adjustments improve drainage and protect tiles, grout, and bath sealing lines. Proper falls support long-term performance within any bathroom layout.

3) Fit extractor fans
Extractor fans remove humid air, limiting condensation around walls, tiles, and fittings. Reduced moisture lowers risks of mould, peeling finishes, and sealant wear. Fans should activate automatically during shower use for consistent ventilation. Effective airflow supports maintaining a dry, healthy bathroom environment.

4) Install a full tanking system in wet zones
Installing a full tanking system is essential within shower areas and wet rooms to support long-term bathroom sealing. This approach helps create a continuous watertight barrier, protecting wall and floor structures from hidden water damage. Before installation begins:
• Dry – ensure surfaces are completely dry
• Clean – make sure the surface is clean with all debris, grease and contaminants removed
• Prepared - to improve membrane adhesion
Tanking systems are applied beneath tiles, working with shower trays to manage constant wet exposure effectively.
Careful planning ensures joints, corners, and edges are fully sealed, reducing future leak risks. Using compatible sealant and silicone sealant supports flexibility where movement or load changes occur. This process is especially important in wet rooms where bath and shower use increases moisture exposure. Once installed correctly, the system supports durability, simplifies maintenance of finishes, and improves overall bathroom performance.

5) Install a high-quality shower tray with sealed edges
Installing high-quality shower trays begins with selecting from stone resin, acrylic, or slate effect options. These types flow alongside low-profile, quadrant, and rectangular designs to suit each bathroom layout. Preparation continues by forming a watertight barrier using silicone sealant applied neatly along edges. This process reduces leaks and limits water damage, while supporting smooth integration with surrounding tiles.
During fitting, professionals use a sealant gun and apply masking tape carefully around corners. Allowing sealant to cure fully ensures sealed perimeters remain stable through daily shower use. Proper installation supports hygiene, simplifies cleaning, and extends tray lifespan within demanding wet zones.

6) Properly waterproof the shower walls and floors before tiling
Proper waterproofing of shower walls and floors starts before tiling, ensuring surfaces remain completely dry and prepared. This preparation must align with selected shower trays, including quadrant, square, rectangular, offset quadrant, low-profile, and slate-effect options. Using bathroom sealing methods alongside membranes helps create a lasting watertight barrier beneath tiles and joints.
Careful application of silicone sealant around edges, corners, and the wall interface reduces leaks and future water damage risks. Following a clear process with the right tools ensures adhesion performs correctly, protecting floors long-term.
7) Protect timber floors with waterproof coatings
Protecting timber floors requires waterproof coatings that support bathroom sealing while preventing moisture penetration beneath finishes. Before installation, ensure surfaces are completely dry, then remove residue carefully, as trapped moisture can affect adhesion.
This protection works alongside shower trays, including quadrant, rectangular, square, offset quadrant, low-profile, and walk-in designs within the shower area. Once installed, coatings help prevent gaps from forming near tiles, corners, and tray edges, supporting long-term performance and reducing future replacement needs.
8) Seal all pipe penetrations and fittings thoroughly
All pipe penetrations require careful bathroom sealing, ensuring gaps around fittings remain fully protected against moisture movement. After removing old sealant, apply new sealant neatly around pipes, keeping surfaces completely dry beforehand. This careful process improves adhesion, helping prevent leaks, protecting walls and tiles, and delivering the best results long term.

9) Seal tile grout using a waterproof grout sealer
Sealing tile grout with a waterproof grout sealer is essential to protect your bathroom from moisture. Applying the sealant carefully across all tiles and corners ensures full adhesion and prevents future cracks or water damage. Using the right tools, including a nozzle or applicator, allows precise coverage along edges and joints, while excess sealant can be wiped with a damp cloth for a smooth finish. After application, the grout must be left completely dry to cure fully, creating a long-lasting protective layer that supports ongoing bathroom sealing and proper reseal maintenance.

10) Use high-quality waterproof membranes behind tiles
When preparing a shower or bathroom floor, installing high-quality waterproof membranes is essential to create a watertight barrier and prevent potential water damage. These membranes adhere directly to the surface using the right tools, ensuring full coverage across walls and floors before tiling. Carefully following a step-by-step guide allows proper alignment, avoiding gaps or bubbles that could compromise adhesion.
Membranes must be pressed firmly into corners and edges, and seams should be sealed with silicone sealant for a durable finish. After installation, allow membranes to cure fully before applying tiles or bathroom fixtures, ensuring long-lasting protection. Using membranes in combination with bathroom sealing and proper bath sealing techniques enhances safety, reduces future maintenance, and supports efficient reseal practices.

11) Use waterproof backer boards
Installing waterproof backer boards provides a strong and reliable base for tiling bathroom walls and floors. These boards improve adhesion and create a watertight barrier, reducing the risk of water damage. Ensure all edges and corners are properly sealed with silicone sealant to maintain continuous protection, while checking that the surface is completely dry before tiling. Following a step-by-step guide helps guarantee a high-quality bathroom sealing process that lasts and prevents future leaks.

12) Waterproof baths, sinks, and basins
Properly sealing around sinks, basins, and tubs prevents leaks and protects surrounding tiles and surfaces. Applying sealant with the right tools, such as a sealant gun and nozzle, ensures even coverage along edges and corners. After wiping away excess sealant with a damp cloth, allow the bathroom to remain completely dry so the material can cure fully. Repeating this process for shower trays and other fixtures ensures a consistent watertight barrier across all surfaces. Regularly inspecting for wear or cracks allows for timely reseal maintenance, maintaining long-term protection.

Buying waterproof bathroom furniture
Standard furniture is not suitable for bathroom environments because wet conditions cause rapid wear and damage. Selecting waterproof bathroom furniture ensures durability and functions as a practical extension of bathroom sealing. This choice effectively creates a protected environment, preventing water damage and extending the life of your sink, tub, or toilet fixtures. Cabinets with sealed edges, floating vanities, and moisture-resistant shelving all contribute to a completely dry and well-maintained surface.
Other examples include wall-mounted cupboards, waterproof laundry baskets, drawer units, mirrored cabinets, and shelving units designed for wet zones. For waterproofing bathroom cabinets and other furniture applying a silicone sealant along edges and corners enhances adhesion and ensures long-term watertight barrier protection. Investing in these solutions allows for a stylish new bathroom that resists cracks, scratches, and moisture-related wear, supporting a low-maintenance and functional bathroom.
Conclusion
Follow our tips above to enjoy a waterproofed bathroom. It is easier than you might think; you do not even need to be a DIY expert. Follow each of our bathroom sealing tips for a nice watertight bathroom.
Do not forget about ongoing maintenance. This includes the need to regularly inspect and replace damaged sealant, as well as reapply sealants periodically as part of maintenance. This is an important part of keeping your bathroom in tip-top condition and in shower waterproofing.
Contact Us
We hope you have enjoyed our article with twelve tips for bathroom sealing. Why not contact us for advice about shower tanking, waterproofing a bathroom, best waterproof shower wall panels and other related topics?
• Phone - 0121 508 9987
• Email - [email protected]
• Contact details – are on our Contact Us Page
• Live Chat – simply click the blue button at the bottom left of any page